I love switching things up in the nail department as much as the next girl, but when the average mani only lasts a couple of days, you have to take matters into your own hands... pun intended. Now I'll be the first to admit that sometimes I just can't be bothered to put in the work to stop my nails from mad chipping, but when time is on my side, so are these four steps. So if you want to make your favourite shade last just a little bit longer (but hate the idea of gel polish), here's a good placee to start:
GET BUFF — Once your nails are clean and bare, gently buffing the surface can really help your polish stick to your nails. But be warned: Too much buffing and your precious digits will pay the price. Stick to about twice a month at most to avoid damage.
CLEAN UP YOUR ACT — Once your nails are nicely buffed, go over them with a little nail polish remover to get rid of any residue. Skipping this step will prevent you from getting the best possible result, so, well, don't.
BUILD YOUR BASE — This step is the biggest pain in the butt, and definitely the one I skip the most, but using a base coat can go a long way towards making your manicure last and giving your polish a nice, even surface to adhere to. Plus it helps keep your nails from yellowing (one of the many joys of excessive polishing).
PUT YOUR TOP ON — Last but certainly not least, try using a gel top coat like this one from Dior. It's my absolute fave because it makes my nails look super shiny and gel-like, plus it makes my polish last twice as long. A reader once told me that she didn't care for this one, so if it's not for you, find a top coat you love and stick with it... Your nails (and the people looking at your Instagram feed) will thank you.
Photos by Mr. AiF
Showing posts with label manicure. Show all posts
{Nailed It} L'Oreal Press-On Nails
Tuesday, November 19, 2013

For the sake of nostalgia, I decided to put my feelings about press-on nails aside (junior high flashbacks, anyone?) just long enough to test out L'Oreal's Colour Riche Press-On Nails in 'Midnight French.' The finish caught my eye immediately (cute, right?), and it reminded me of this manicure I never quite was able to replicate. Fun finger effects aside, here's the low down on the kit:

The nails were quite easy to apply, but since they skewed a little larger, it was hard to find matches for some of my nails. And even though I followed the directions to a t, one fell off mere hours later. All in all, they felt fake and frumpy, and my stance on press-ons has forever been reaffirmed — no matter how cute the finish. xx
{Glitter Week} Glitter Half Moon Manicure...
Thursday, January 31, 2013

No theme week is complete without a manicure, and since I've been meaning to try a glitter half moon mani after seeing one on Emily last month, I figured there was no time like the present. The verdict? It's pretty much the greatest manicure known to man. The end result is just so chic and fun, and the glitter really takes it up a notch. I think I'll have to try it again with pastel base, perhaps a nice mint... Oh the possibilities.
Happy Thursday, friends! xx
Get the look: Deborah Lippmann 'Boom Pow' glitter polish // OPI 'Chick Flick Cherry' polish
{Nailed It} Metallic Sharpie Mani...
Wednesday, January 9, 2013

I love painting my nails as much as the next girl, so when I saw this metallic Sharpie mani on The Beauty Department a while back, I couldn't wait to try it myself. It's probably the easiest manicure I've ever done, and so long as you have a decently steady(ish) hand, I'm sure you'll agree. The best part? There's no limit to what you can do! Chevrons? Sure! Polka dots? OK! Hearts? Why not! Just do yourself a favor and don't skimp on the top coat — Believe me, that marker will fade right off. xx
Details: Essie nail polish in Turquoise & Caicos; Sharpie in metallic gold
{Nailed It} Blood-Drop Mani DIY...
Tuesday, October 30, 2012
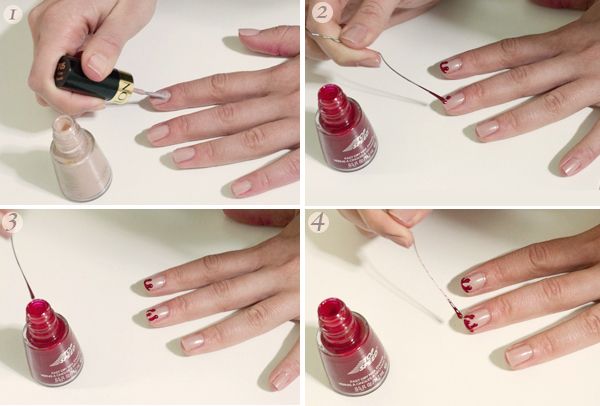
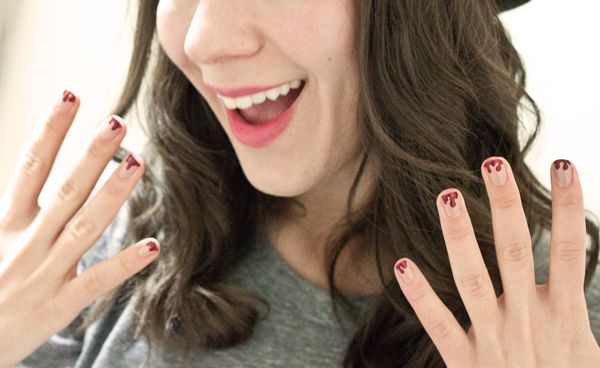
Halloween is nearly here, and what better way to spread some ghoulish cheer than with a blood-drop DIY mani a la Prabal Gurung? This was beyond easy to do, and it took no time at all... So basically all you vampire-loving, Dexter-obsessed peeps have no excuse not to try this one. Here's what you need to do!
Step 1: Paint your nails with a nude base coat to give them a clean, polished look. Alternatively, leave nails completely bare— it's up to you!
Step 2: Dip a toothpick or bobby pin into a deep red polish and apply small dots at random to the bottom third of your nail (2 or 3 dots per nail looks best).
Step 3: Drag the nail polish from the dots you just created down to the tip of the nail.
Step 4: Repeat for all nails, finishing with a uneven horizontal line at the tip of each nail.
And that's it! For a mere 10 minutes of work, you've got yourself a creepy, yet surprisingly chic manicure... How's that for doing it yourself? xx
Subscribe to:
Posts (Atom)