Powered by Blogger.
Showing posts with label Do it yourself. Show all posts

{DIY} Conversation Heart Ring

Thursday, February 6, 2014

 photo Valentines-Day-Conversation-Heart-Ring-DIYcopy_zps3473c6c6.jpg
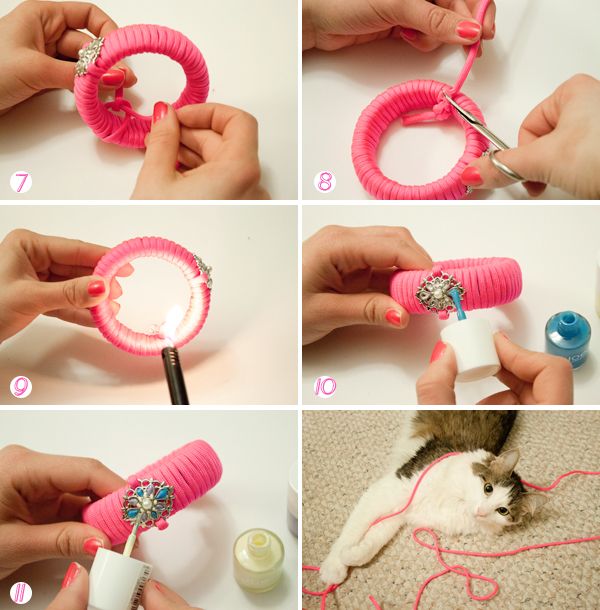
I'm a total sucker for conversation heart candy (but really, who isn't?), so I thought it would be fun to make a ring of my favourite Valentine's treat. It's fun, easy and a super cute way to embrace this time of the year, so if you want to be a cheeseball and join the fun, here's what you've got to do!


 photo ClayRingDIYStep1_zps0fe17b87.jpg
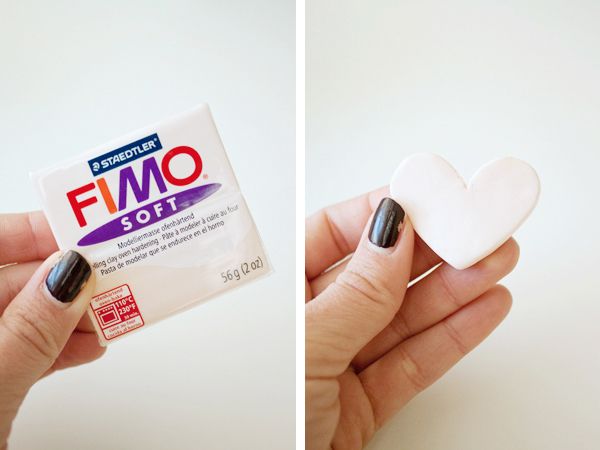
Using soft FIMO clay, warm a small piece between your hands for a few minutes to make it malleable. Roll out the clay and smooth any bumps or ridges from the surface. Using a knife, cut out a heart shape, working the edges so they're smooth and the heart is symmetrical.

When you're happy with your shape, pop that bad boy in the oven and bake it following the package instructions (mine took about 30 minutes to harden). Once that's done, allow the shape to cool fully.

 photo ClayConversationRingDIYStep2_zps778b3e03.jpg
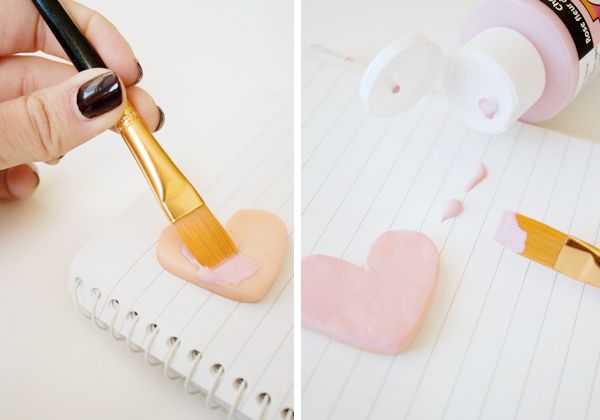
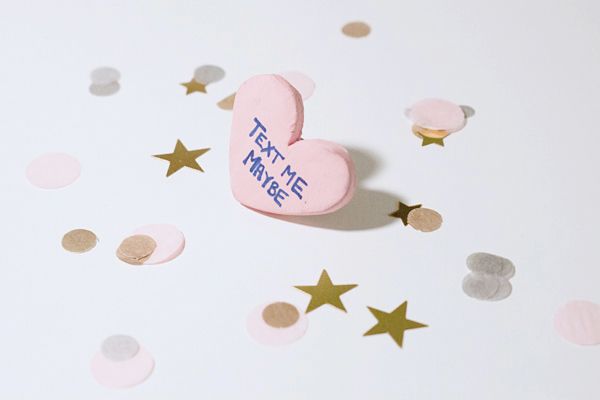
From there, paint the heart using an acrylic paint (you could even use nail polish!). I chose light pink because it reminds me most of the candy, but you can get as creative as you like with this one. Once dry, use a felt tipped pen to write your message. I had a hard time choosing between "Cute Tush," "Hollah At Your Girl" and this one, but "Text Me Maybe" won out in the end, hands down.

 photo ClayConversationRingDIYStep3_zpsd3d51f58.jpg
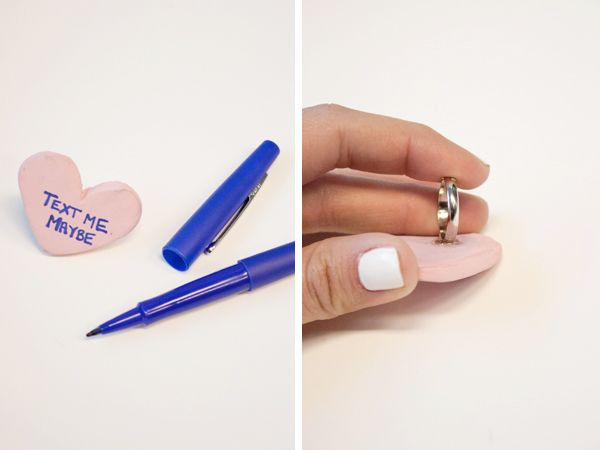
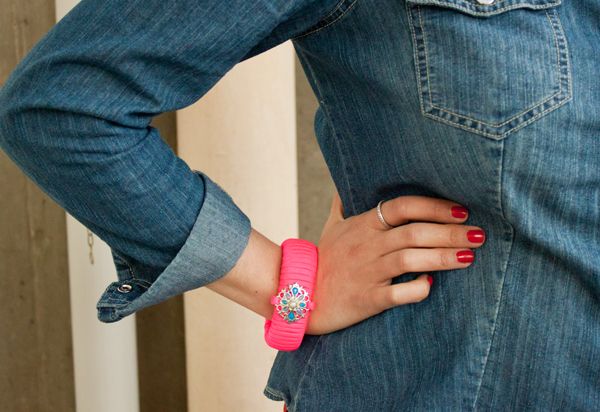
Let the ink dry for as long as possible to avoid smudging, then glue a ring to the back of the heart, pressing firmly for about 30 seconds to adhere... How easy is that? xx

 photo ConversationHeartRing_zps746a772e.jpg
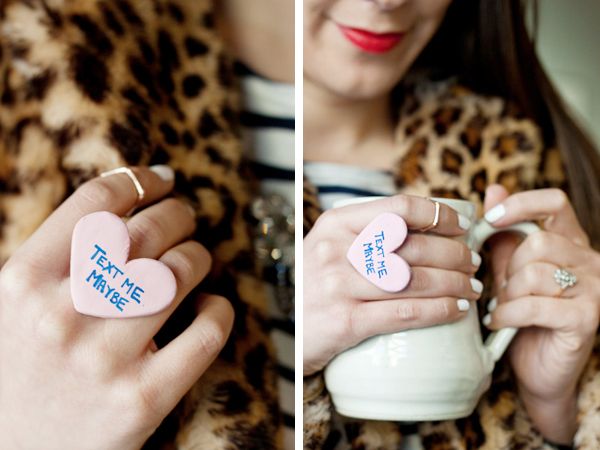
Final photo by Sam Brooks

{Homemade Holiday} Rosette Ring DIY

Thursday, November 21, 2013

 photo IMG_9136copy_zpsbebffa7a.jpg
In the spirit of last week's animal ring holder, I thought I would put together an simple gift idea to accompany it — et voila! The rosette ring was born. It's the perfect little add-on to give a girlfriend or pop into a stocking, and it even functions as a last-minute gift if you're in a pinch (oh who am I kidding, when you're in a pinch). So if you want to make a rosette ring of your own, here's what you'll need:

 photo RosetteRingDIYSupplies_zps0f4e4089.jpg
Supplies:
 - Adjustable rings (available at any craft or jewelry supply store)
 - Rosette cabochons (mine are vintage, but there are lots to choose from on Etsy!)
 - Jewelry glue

{DIY} Easy Statement Earrings

Tuesday, October 22, 2013

 photo statementearringdiy_zps377f25a9.jpg
I was craving an easy DIY this weekend, so I decided to whip out my trusty Shrinky Dinks and try my hand at a simple, lucite-inspired statement earring. I have a hard time wearing larger earrings because I find them too heavy and taxing on my lobes, so this fun, lightweight solution really appealed to me. Read on for instructions!

 photo StatementEarringsDIY_zps47707792.jpg  

 Supplies: 
  • Shrinky Dinks (available at any craft store)
  • Scissors
  • Holepunch
  • Paper + pen
  • Jewelry glue
  • Decorative gems
  • Jump rings + earring hooks 
 Instructions:

1. Trace your shape onto a Shrinky Dinks sheet, making it three times larger than your desired end result.
2. Cut out the shape, taking care to even out the edges.
3. Punch a small hole into the top of your shape, then bake the shapes according to the instructions on the Shrinky Dinks package.
4. Once cooled, start gluing decorative gems and pearls onto the surface of the earrings.
5. Secure the earring hooks to the base with a jump ring.
6. Give yourself a pat on the back — you're done!

 photo IMG_9176_zps11abcfdc.jpg

{DIY} Kenzo-Inspired Eye Clutch...

Tuesday, September 24, 2013

Kenzo-inspired eye clutch DIY 

I'm a big Kenzo fan, and even though I still have tiger fever, I was pretty excited by their new eye motif... Plus the fact that I could quickly and easily recreate the clutch for a whole lot less didn't hurt either.

Wanna get your Kenzo on too? Grab your art supplies ladies, because this DIY is as fun as it is simple!
Supplies: 
  • Simple black clutch (I got mine from Forever 21)
  • Black sharpie
  • White acrylic paint
  • Thin brush
Kenzo-inspired eye clutch DIY  

Start by drawing the eye shape on the clutch using a black Sharpie (Note: Don't worry about making mistakes at this stage — you'll be covering over the marker soon). Using small, even brushstrokes, start painting in the whites of the eye with your acrylic paint. Give the clutch a second coat of paint, and once your design is completely dry, clean up any smudges with your Sharpie... Easy does it.

Kenzo-inspired eye clutch DIY
I hope you guys enjoyed this DIY project, and as always, thanks for reading! xx

{Inspiration} Three DIYs To Try...

Tuesday, September 10, 2013

 photo 3DIYsToTry_zps6e0e21f0.jpg

If there were more hours in the day, I would spend them DIY'ing up a storm... Until that happens, however, there's always Pinterest for daydreaming purposes. I scratched the galaxy pendant DIY off my list last night by making one for a friend, which means there might be a lips clutch (an oldie but a goodie!) or spotted shoe project in my near future... But if not, hey — one out of three ain't bad either.

What projects are you guys working on? xx

Galaxy pendant DIY | spotted shoe DIY | Lulu Guinness-inspired lips clutch

{DIY} The Repurposed Necklace...

Wednesday, July 24, 2013

 photo IMG_9078_zps3ade417e.jpg

Last night I realized that it had been waaaay too long since I DIY'd (stupid work and life getting and, well, Netflix getting in the way), so I put my thinking cap on and ransacked the apartment for project ideas. After looking through a cramped jewelry drawer, I quickly realized that I have far too many earrings that go unworn, and — light bulb moment — why not turn some of those old baubles into a necklace?!

Like what you see? It's the easiest! Here's the drill:

 photo IMG_9028copy_zps3fa430b1.jpg

The Supplies: 
 
- Old earrings
- Chain
- Jump rings
- Tools

  photo repurposeddinner_zps710909f7.jpg

The Steps:

1. Detach all the components you plan to use from your earrings.
2. Take special care to remove all traces of the earring posts — Trust me on this one.
3. Collect all the pieces you plan to use and mock up where they're going to sit on the chain.
4. Attach your first piece at the centre of the chain using a small jump ring.
5/6. Continue attaching your components until the necklace is complete.

** Marvel at how easy this was and what a crafty-crafterson you are... You've earned it. 

 photo IMG_9064copy_zpseb0a2ec0.jpg

Ta-daaaa! A repurposed necklace to call your very own... Tres chic! Thanks for reading, friends! xx


 photo IMG_9072_zps8bc87971.jpg
 Photos by Andrew Tarver

{DIY} Printed Pumps...

Tuesday, June 11, 2013

 photo shoediy2copy_zps5c820df8.jpg

I've had the idea to Modpodge my pumps into something new and slightly more interesting for weeks now (since I fell in love with these badboys) but I just couldn't get it together until now... Well I'm going to go ahead and say that it was worth the wait, because not only am I in love with the patterned paper I scored after weeks of searching, but both the shoes AND the paper ended up going on sale by the time I came around to buying them! Cha-ching! So for a modest $22, I have a pair of shoes that I'm actually excited to wear... I believe that's what they call a win-win, no?
Here's what you'll need for this DIY:

 photo IMG_3422_zps963284be.jpg
  • Shoes 
  • Modpodge 
  • Patterned paper
  • Paint brush
  • Scissors
  • Time, patience + fresh air
 photo steps_zps33866f88.jpg

This one is suuuuper easy, it's just a little tedious and time consuming.  As you know from previous Modpodge DIYs, simply cut strips of paper to have on hand (by the end I was just tearing pieces at random) and apply a layer of Modpodge onto the surface of the shoe. Once that's done, press the paper firmly over the glue and hold to adhere to the shoe. Seal the paper in place with another coat of glue, covering the entire shoe in this way. Let dry overnight to set everything in place, and you're done! Headrush and all.


Thanks for reading, and if you end up trying this or any other DIY you've seen on the blog, I'd love to hear how it goes... Happy crafting, friends! xx

{DIY} Neon Rope Bangle with Pendant...

Tuesday, April 16, 2013

 photo IMG_7263_zps77b5d46b.jpg

I've been sitting on this DIY for weeks now because I haven't had any spare time to craft... I know, I know, tisk tisk. Anyway, I thought it would be fun to bring life to an old, thrifted bangle, so after picking up some neon thread and a pretty little pendant from Michael's, I was in business. This project was super easy and inexpensive to make, and I'm obsessed with the result... Hey, anything neon is fine by me!

Want to make a bracelet of your own? Here's what you've got to do:

 photo ropebracelet_zps47162e2a.jpg

1. Start by securing the rope to your bangle with some glue to hold it in place while you work. The nature of the materials make them hard to adhere, but it will help to have the end temporarily secured.
2. Start wrapping the rope around the bangle, pulling tight as you go around.
3. Continue to tightly wrap the bangle until you get about three quarters of the way around the bracelet.
4/5. Weave the end of the rope through the pendant and out the other side, pulling it through and positioning it on the bangle.
6. Keep wrapping the bangle until the base is no longer visible.

 photo ropebracelet2_zps36b704a4.jpg

7. Release the glued end and tie a double knot to secure the rope in place.
8. Cut the ends off closely.
9. Singe the ends of rope slightly to avoid fraying.
10/11. Paint the pendant with nail polish in colours of your choosing. Add two or three coats depending on the thickness of the polish used.
12. While your bracelet dries, use the leftover rope to play with your cat or any other willing participant... How cute is Meows?!

 photo IMG_7210_zpsf69c0cfb.jpg  photo IMG_7197_zps03f0fc36.jpg

And that's it! Thanks for reading, lovelies! xx