Powered by Blogger.
Showing posts with label crafting. Show all posts

{DIY} Kenzo-Inspired Eye Clutch...

Tuesday, September 24, 2013

Kenzo-inspired eye clutch DIY 

I'm a big Kenzo fan, and even though I still have tiger fever, I was pretty excited by their new eye motif... Plus the fact that I could quickly and easily recreate the clutch for a whole lot less didn't hurt either.

Wanna get your Kenzo on too? Grab your art supplies ladies, because this DIY is as fun as it is simple!
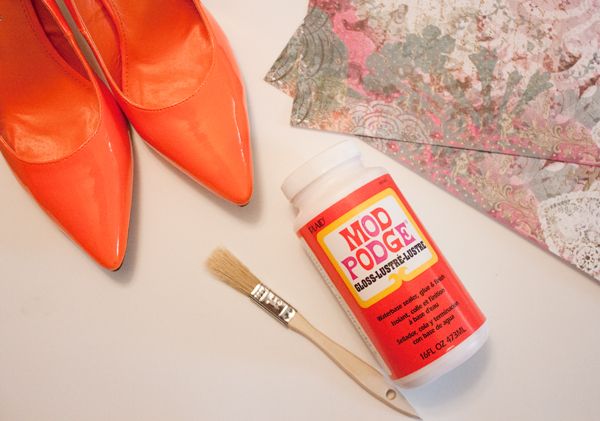
Supplies: 
  • Simple black clutch (I got mine from Forever 21)
  • Black sharpie
  • White acrylic paint
  • Thin brush
Kenzo-inspired eye clutch DIY  

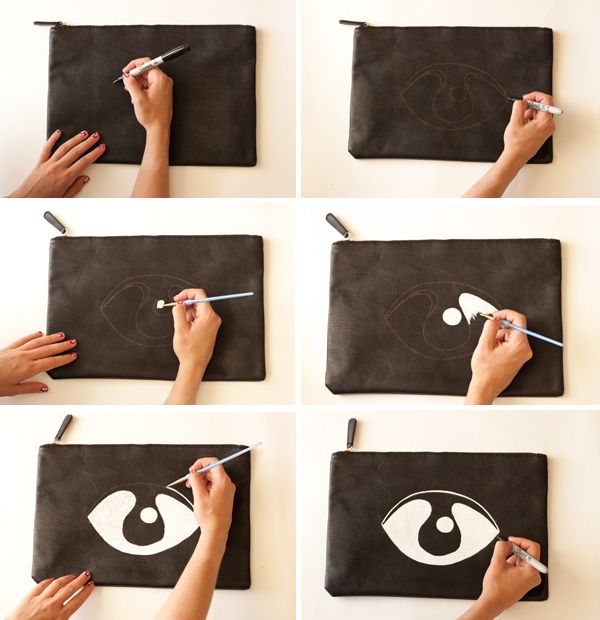
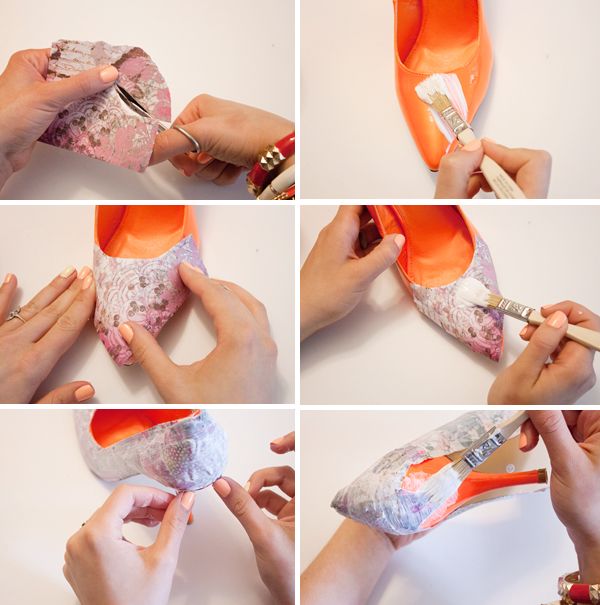
Start by drawing the eye shape on the clutch using a black Sharpie (Note: Don't worry about making mistakes at this stage — you'll be covering over the marker soon). Using small, even brushstrokes, start painting in the whites of the eye with your acrylic paint. Give the clutch a second coat of paint, and once your design is completely dry, clean up any smudges with your Sharpie... Easy does it.

Kenzo-inspired eye clutch DIY
I hope you guys enjoyed this DIY project, and as always, thanks for reading! xx

{Inspiration} Three DIYs To Try...

Tuesday, September 10, 2013

 photo 3DIYsToTry_zps6e0e21f0.jpg

If there were more hours in the day, I would spend them DIY'ing up a storm... Until that happens, however, there's always Pinterest for daydreaming purposes. I scratched the galaxy pendant DIY off my list last night by making one for a friend, which means there might be a lips clutch (an oldie but a goodie!) or spotted shoe project in my near future... But if not, hey — one out of three ain't bad either.

What projects are you guys working on? xx

Galaxy pendant DIY | spotted shoe DIY | Lulu Guinness-inspired lips clutch

{DIY} Printed Pumps...

Tuesday, June 11, 2013

 photo shoediy2copy_zps5c820df8.jpg

I've had the idea to Modpodge my pumps into something new and slightly more interesting for weeks now (since I fell in love with these badboys) but I just couldn't get it together until now... Well I'm going to go ahead and say that it was worth the wait, because not only am I in love with the patterned paper I scored after weeks of searching, but both the shoes AND the paper ended up going on sale by the time I came around to buying them! Cha-ching! So for a modest $22, I have a pair of shoes that I'm actually excited to wear... I believe that's what they call a win-win, no?
Here's what you'll need for this DIY:

 photo IMG_3422_zps963284be.jpg
  • Shoes 
  • Modpodge 
  • Patterned paper
  • Paint brush
  • Scissors
  • Time, patience + fresh air
 photo steps_zps33866f88.jpg

This one is suuuuper easy, it's just a little tedious and time consuming.  As you know from previous Modpodge DIYs, simply cut strips of paper to have on hand (by the end I was just tearing pieces at random) and apply a layer of Modpodge onto the surface of the shoe. Once that's done, press the paper firmly over the glue and hold to adhere to the shoe. Seal the paper in place with another coat of glue, covering the entire shoe in this way. Let dry overnight to set everything in place, and you're done! Headrush and all.


Thanks for reading, and if you end up trying this or any other DIY you've seen on the blog, I'd love to hear how it goes... Happy crafting, friends! xx

{DIY} Pom Pom Sweater...

Tuesday, April 23, 2013

 photo IMG_7856-1_zps715922c1.jpg  photo IMG_7889_zps9e6f41a1.jpg  photo IMG_7802_zps53a59590.jpg  photo IMG_7893_zpsc4a39788.jpg  photo IMG_7840_zps8456edd7.jpg

You know when you see something that leaves an impression on you, only to file it away until something triggers it back? Well that's what happened here. I saw this outfit post on Design Love Fest few months ago, squealed in delight (pom poms!) then just kinda forgot about it... Until one fateful trip to the craft store where I spotted a bag of delightfully colorful pom poms just dying to make a DIY appearance.

So early Sunday morning I got up, poured myself some coffee and dragged Mr. AiF to my mini home office to get cracking. There's not really much to this DIY (it's sew easy... zing!) so I spared you the step-by-step deets, but here you have it, friends — Pom pom city! Stay tuned tomorrow to see the end result... xx

{DIY} Neon Rope Bangle with Pendant...

Tuesday, April 16, 2013

 photo IMG_7263_zps77b5d46b.jpg

I've been sitting on this DIY for weeks now because I haven't had any spare time to craft... I know, I know, tisk tisk. Anyway, I thought it would be fun to bring life to an old, thrifted bangle, so after picking up some neon thread and a pretty little pendant from Michael's, I was in business. This project was super easy and inexpensive to make, and I'm obsessed with the result... Hey, anything neon is fine by me!

Want to make a bracelet of your own? Here's what you've got to do:

 photo ropebracelet_zps47162e2a.jpg

1. Start by securing the rope to your bangle with some glue to hold it in place while you work. The nature of the materials make them hard to adhere, but it will help to have the end temporarily secured.
2. Start wrapping the rope around the bangle, pulling tight as you go around.
3. Continue to tightly wrap the bangle until you get about three quarters of the way around the bracelet.
4/5. Weave the end of the rope through the pendant and out the other side, pulling it through and positioning it on the bangle.
6. Keep wrapping the bangle until the base is no longer visible.

 photo ropebracelet2_zps36b704a4.jpg

7. Release the glued end and tie a double knot to secure the rope in place.
8. Cut the ends off closely.
9. Singe the ends of rope slightly to avoid fraying.
10/11. Paint the pendant with nail polish in colours of your choosing. Add two or three coats depending on the thickness of the polish used.
12. While your bracelet dries, use the leftover rope to play with your cat or any other willing participant... How cute is Meows?!

 photo IMG_7210_zpsf69c0cfb.jpg  photo IMG_7197_zps03f0fc36.jpg

And that's it! Thanks for reading, lovelies! xx

{DIY} Marc Jacobs-Inspired Ball Necklace...

Wednesday, March 20, 2013

 photo ballcopy_zps1a57dc0d.jpg

With more things on my calendar and to-do list this week than I care to count, I was in the mood for the quickest, easiest possible DIY... Enter the ball necklace. When I saw this simple yet oh-so chic necklace from Marc by Marc Jacobs, I realized that I could put something similar together in five minutes flat. Sound doable? Here's what you've got to do!

 photo necklace-1_zps906372fd.jpg

1. Cut a vibrant embroidery thread into a 16" piece.
2. Take a crimp bead and tightly secure it to the end of the thread.
3. Repeat on the other end of the thread.
4. Add three medium sized ball beads to the thread. I chose these white ceramic ones, but the sky's the  limit here friends.
5. Add jump rings to each crimp bead.
6. Secure a lobster clasp to one of the jump rings and throw on that shiny new necklace of yours!

 photo IMG_3845_zpsfc571a8a.jpg  photo copy-2_zps50308bba.jpg

{DIY} Polka Dot Jeans...

Tuesday, February 26, 2013

 photo IMG_1400copy2_zpsdc44ca45.jpg

I've wanted these polka dot jeans from the Gap for aaaages, but never got around to buying them, partly because I didn't think I should spend 70 big ones on a trend item, and partly because I wanted to make my own version. This is probably the easiest DIY I've ever done (apart from just slathering nail polish on jewelry), and I'm ecstatic with the result. I mean seriously, all you need is a pair of jeans (washed, if they're brand new!) and a fabric paint pen from the craft store... How easy is that?!

 photo polkadotjeansdiy_zpsccca2235.jpg

Since these bad boys are DIY I wanted them to look that way, so I didn't bother measuring out my polka dot placement. I really like the irregular, freestyled effect, but if you prefer a more symmetrical look, refer to this post. If you're a free spirit (aka- lazy) DIY'er like me, just dot away— I bet you'll love the effect either way. Just remember not to wash your snazzy new jeans for at least 72 hours after completing the DIY to preserve your pretty little dots! Easy peasy. xx

 photo IMG_1393copy_zps3e6a2255.jpg